Showing posts with label Children's Stuff. Show all posts

Friday, 2 November 2018

Dia de los Muertos Halloween Costumes


Halloween is not a traditional holiday in my country, however, I love it for various reasons. The roots are Celtic, and the Celts lived in my native country before the Romans came. Also, I am fascinated how a pagan holiday blended in Christian religion, resulting in folkloristic traditions that probably most people around the world don't know anymore, because today's Halloween has become quite a commercialized event with not much left in common with the ancient believes. Plus, my kids love to dress up, and I love to make costumes, and it's a good opportunity for all of us to shorten the time until Christmas and put some colour and excitement in the dark evenings of autumn.

Source
 When my husband came up with the idea for new costumes I was hooked. He knows my love for Mexican culture, and the Day of the Dead is certainly something that fascinates people all over the world. This holiday developed from the catholic holiday that is celebrated on the day after All Saints' Day (or Allhallows in older English, therefore Halloween, for Allhallows' evening), on November 2nd. Because of the beautifully spooky costumes and the painted skull decorations that are distinctive for those celebrations and because of the proximity of this holiday to Halloween, the Mexican costumes and specific facial paintings have become popular even in Europe. No wonder I was excited to make some costumes for my kids inspired by the Dia de los Muertos.

As a sewer and a huge admirer of authentic folkloristic crafts, one of the most beautiful things I have ever come across are the various and extraordinarily beautiful traditional costumes of the regions of Mexico. The rich and colourful embroidery is thrilling, and I could spend hours rolling over pictures of those garments that have their origins in Azetc traditions that were mixed with Spanish motives. Of course it would be convenient to have an embroidery machine, but still, trying to produce garments that would look authentic would still be a huge challenge and very time-consuming.


To keep it simple, I made a Charro style jacket for my son from a pattern for a short collarless jacket I found in my 1950s Lutterloh book. It was by the way the first time I made a two-piece sleeve. It didn't turn out too well because the fabric was a rather cheap synthetic material, but it was certainly a good experience. I also made a red scarf and sash. Luckily I found a cheap felt sombrero from an online shop, and some black trousers completed the outfit. (He first refused to wear it as he wanted to be a ghost or a spider or a transformer. I insisted, as he should match his big sister and it's probably the last time mommy can put him into a costume like that...)


My daughter's costume was far more time-consuming. The skirt should recreate the look of embroideries on a bottom ruffle. I spent much time studying pictures of amazing traditional Mexican garments. I sketched some flowers and leaves and made my own stencils, and in some of my many sleepless nights I printed them on the fabric. The material is a rather slinky viscose (rayon) javanaise, similar to a challis, but with a hint of a shine. Maybe not the best choice, but I had it in my stash, and plenty of it, and the skirt would certainly be very flowing a good for twirling. Hand printing viscose was a new experience for me, and I was happy I made some tests before starting with the pieces I planned to use for the ruffle. It's quite different from cotton! There are various flowers, and I used as many colours as possible.


I certainly don't claim this IS a Mexican skirt, but I tried to be as close to the embroidered costumes as possible. And even though my printed version doesn't justice to the beauty of the originals, it's certainly a garment that shows my deep admiration for the traditional outfits.


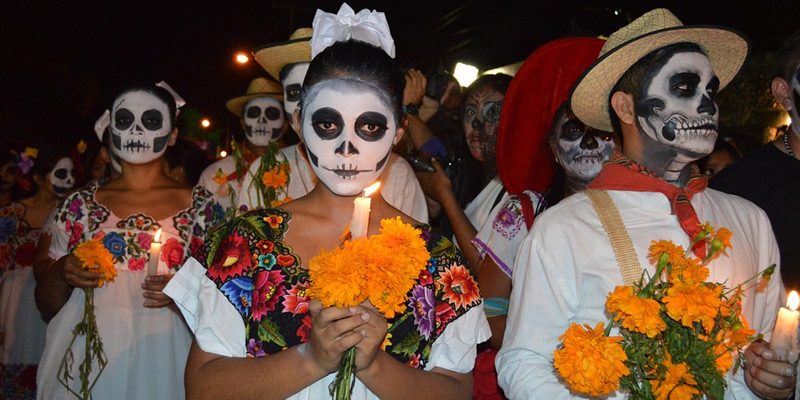
When it came to making the floral crown, I took to it like a duck to water. I love Frida Kahlo's look and especially her hairstyles, and my daughter does too. There was no doubt it would be the template to follow by for the updo. Felt is a wonderful material for making flowers.


As an avid gardener I absolutely wanted to make flowers that had something to do with Mexico, so I made some researches. To my utter surprise, many of our annual garden flowers originally are native to Mexico, as marigold, cosmea, zinnia and dahlia. I added lilies, calla lilies and some roses, as these are popular in Mexican culture like Mexican folk songs, embroideries etc. Finding a way how to fix and arrange all the flowers on a headband was rather tricky. I couldn't find a tutorial that would meet my needs, as my flowers are a bit heavier than ready-made synthetic faux ones. So I had to find my own solution. But I think it was totally worth all the hours I spent on it, and also stitching almost all the flowers to the headband by hand instead of using the glue gun.


My daughter's costume is completed by a true Mexcian embroidered blouse I found incredibly cheap for a couple of bucks on Ebay, plus a pashmina shawl from my wardrobe. I must admit I am no very skilled at painting my kids' faces on such occasions, but I was quite pleased with the result, keeping it rather simple.

Even if I didn't have as much time as I would have liked, and despite working mainly in the night (oh black fabric really IS a pain in the back in poor light!), everything looked much better than I had hoped. I am well aware that most people are happy with off-the-rack costumes that are available for little money and that can be thrown away after some wear. Yes, I am a bit crazy for all the effort I put in the kids' costumes.

At least a carved ghost for my son's pumpkin...

...and a Mexican skull on my daughter's. I might need some practice.


This gap-toothed little señor completely stole my heart...


Charro costume:
Jacket: self-made after Lutterloh "Der Goldene Schnitt" (The Golden Rule), book edition 6-1949, mod. 139, p. 80
Felt Sombrero: costume online shop on Ebay
Sash: handwoven from Mexico

Frida costume:
Skirt: hand-printed and self-made dirndl skirt with hand-printed ruffle (no pattern required)
Blouse: true Mexican embroidered blouse, Ebay
Flower crown: self-made felt flowers on head band

Friday, 17 February 2017

Vintage Inspired Child's Pierrot Costume


Yesterday in the late morning I realized with panic that the next day my son will have a carnival party at his kindergarten. More than a year ago I have made a bat or vampire costume for Halloween that still fit him, but would be far too warm to be worn indoors. I love my kids, I love costumes, I love sewing, no question I had to make urgently something new for him to wear.

Gestern morgen stellte ich mit Schrecken fest, dass schon am kommenden Tag die Fasnacht-Party im Kindergarten meines Sohnes ansteht. Vor über einem Jahr hatte ich für ihn eine Fledermaus-Kostüm genäht, das ihm zwar noch passte, aber für drinnen viel zu warm war. Ich liebe meine Kinder, ich liebe Nähen, ich liebe Kostümnähen, deshalb stand es ausser Zweifel dass ich noch rasch etwas Neues anfertigen würde.


I had a quick look at some pictures on internet. Having a harlequin print in my stash that was not the best quality, I decided to combine it with a black left-over from another project. As I didn't have a pattern, I was happy to find this early 1950s pattern (could also be late 40s) that also came along with a picture of the back envelope. (I love old patterns as they show the actual pattern pieces.) So it was a "pierrot" costume and vintage - double win!

Ich schaute rasch ins Internet. Zu Hause hatte ich einen Harlekin-Stoff, der nicht die beste Qualität war, und ich beschloss, diesen mit einem Rest eines andern Projekts zu kombinieren. (Es war dies übrigens das schlimmstes Kauferlebnis je - die Schweizer Ladenkette créasphère kann mich definitiv von der Kundenliste streichen! Der Stoff wurde uns zu teuer verrechnet an der Kasse, und als mein Mann tags darauf nochmals in den Laden ging, gab das Personal zwar den Fehler zu, teilte aber freundlich lächelnd mit, dass der zu viel kassierte Betrag nicht zurück erstatte werden könne. Und dies, obwohl mein Mann gerade im Begriff war, noch weiteres Material zu kaufen. Mittlerweile habe ich erfahren, dass der miserable Kundenservice bei créaspère offenbar geradezu an der Tagesordnung ist. Zu kurz oder schief abgeschnittene Meterware, komplett ahnungsloses Personal, unfreundlich... Ich werde innkünftig mein Material ganz sicher nicht mehr dort kaufen.) Ich hatte keinen Schnitt, deshalb war ich froh, dass ich diesen Schnitt aus den frühen 1950ern fand (vielleicht auch Ende 40er), zu dem es sogar ein Bild von der Rückseite des Musters gab. (Ich liebe die alten Schnitte, da konnte man immer auch die eigentlichen Schnittteile sehen.) Ein Pierrot-Kostüm UND Vintage - doppelter Gewinn!

The patterned fabric was very soft and wrinkles sadly a bit too easily, I guess it's rayon. It would be OK for the sleeves and the pants. The black solid cotton was a tiny bit stiffer, so I couldn't combine the two fabrics and make the blouse half black, half patterned. For this part of the costume I drafted the pattern after the little pattern sketch on the envelop. Sewing pants regularly for my kids, I didn't need a pattern, I just had to make sure the legs would turn out a bit puffier.

Der gemusterte Stoff war sehr weich und knitterte leider sehr leicht, ich denke es ist Viskose. Das würde sicher noch gehen für die Ärmel und die Hose. Der schwarze Stoff hatte etwas mehr Stand, deshalb konnte ich nicht eine Hälfte des Oberteils schwarz und die andere gemustert machen, dazu waren die Materialien zu unterschiedlich. Für dieses Teil entwarf ich meinen eigenen Schnitt nach der Skizze auf dem Schnittmuster-Umschlag gemäss den Massen meines Sohnes. Die Hose war einfach, da ich für die Kinder viele Hosen nähe, sie musste bloss etwas weitere Beine haben.


I started cutting the fabric at 2 p.m. and finished both garments at 8 p.m. (in the meantime I had to make homework with my daughter, cook dinner, wash some laundry...), so it was a real quick project, and for desert I made the little hat. I ironed some of the patterned fabric on some thick felt (the kind of iron-on material you would use for applications) and made a red pompom. I was very proud as I didn't have to work the whole night through as usual when I do this kind of last-minute projects, and I used all materials from my stash, I didn't have any issues, not even with my certainly not perfect self-drafted pattern, and -last but not least at all - my wee man looked so happy and cute when he put on his costume today. I would say this project counts totally for my “sewwhatyougot challenge, this is no. 2, and yes, I still owe you no. 1.

Gegen 14h begann ich mit dem Zuschnitt, beide Teile waren um 20h fertig (wobei ich in der Zwischenzeit noch die Hausaufgaben mit meiner Tochter gemacht habe, Abendessen gekocht, Wäsche gewaschen...). Ein wirklich schnelles Projekt, und zum Dessert machte ich noch das Hütchen. Ich fixierte den gemusterten Stoff mit Vliesofix auf dicken Bastelfilz und machte noch einen Pompom aus rotem Garn. Ich bin ziemlich stolz weil ich ausnahmsweise mal keine Nachtschicht machen musste (wie sonst jeweils bei solchen kurzfristigen Projekten), weil ich alle Materialien bereits hier hatte, weil es keine Probleme mit dem sicherlich nicht perfekten selbst entworfenen Schnitt gab, und am meisten weil mein kleiner Mann heute Morgen so glücklich und süss ausgesehen hat, als ich ihm das Kostüm anzog. Ich würde mal sagen, dass das ganz eindeutig für meine #sewwhatyougot Challenge zählt, dies ist schon das zweite Projekt. Und ja, ich schulde Euch noch das erste. 


My little man and his proud big sister

Pattern: self-drafted after Advanced 701
Fabrics: from my stash
Mask: purchased

Edit: For those who, like me, love to dig a bit into the history of patterns...
I looked up the pattern (now that the sewing frenzy for the costume is over) to see if I could find out more about this pattern, and it seems to be very interesting. There was also a children's version, Advanced 707, and both patterns were reissued in the 50s. The first issue was from 1949.


The late 40s children's version

The 50s reissued versions


Monday, 27 January 2014

Children's Carnival Costumes


I know, this is mainly a blog about vintage sewing and all related things, but I am also a "modern" sewer for my children and for those of my customers. There is one thing I have never really done before: costume sewing. I made a kilt for my little son and a Scottish inspired medieval skirt for my daughter and me last summer for the Highland Games. But I had not so much opportunities, as the examples for those garments didn't allow too much room for my own imagination and fantasy.

So when my husband told me it would be nice to attend at the annual masquerade parade for carnival this year, it was quite a challenge, as carnival in my region is very early. OMG, it's so soon after Christmas! I had to hurry to chose the costumes and order the materials. My daughter, as usual recently, wanted to be a princess or an elf, and as my little son has not yet an opinion of his own (not to mention that he still doesn't talk), I decided to make toadstool costumes for both. For my daughter a kind of toadstool princess, and my son would be a sweet little toadstool boy.

I had no pattern, so I took some inspiration from the internet and created some simple base garments which could be "upgraded" into mushrooms.
I used mainly fleece to make the costumes warm and cozy. First I made an overall for my son with some appliques on the lower part, so it looked like grass growing up his legs. There is even a lucky shamrock on his bottom. Both, the toadstool and the shamrock, are symbols for good luck in my country, and my son's name is Irish, so it's perfect. The overall was large enough to wear several layers of underwear, as temperatures are still very cold here, and we even had some snowfalls during the night.

My daughter absolutely wanted a skirt. She's very girly currently, and she likes ballet, so I decided to make her a tutu. I cut strips of white and red tulle and knotted them on an elastic band. It looked really poofy in the end, and she was totally in love with her new skirt from the first moment on...

The biggest challenge was the hats. My son's hat had to be smaller, so it would not disturb him while sitting in the pram, but her's should be large to keep the proportions of a real mushroom. I didn't use a finished polka dot fleece, as I wanted to look the pattern more natural and irregular, so I had to cut lots of white "dots" and sew them on the red fabric. After stuffing my daughter's hat, I tried it myself on and realised it was too heavy. My husband had a brilliant idea, and we used an inflatable swimming ring as stuffing.

The parade should be held on Sunday shortly after midday, but on Saturday afternoon I realised I had forgotten  two important things: the crown for the princess and the bags for the confetti. For the bags I used a red fleece with withe polka-dots which I sew to a base of very thick crafting felt. I cut the crown from the same material in yellow to create a crown. I added a velcro closure, so the crown could be stored flat while not in use. As I am a very crafty person, I also had some nice rhinestones in different shapes and colours at home which I sewed on the crown.

We had a lot of fun during the parade and afterwards at the children's carnival party. There was even a contest for the best costume, and my children won the first place, but unfortunately we had left earlier as the little ones were too tired, so we didn't win the award. 

Sunday, 4 August 2013

Girl's and woman's medieval Scottish inspired skirts

Two lassies, two lads...

In my previous post I was writing about the Highland Games we went to see. Hot summer temperatures asked for a light outfit for me and my daughter.

I had some tartan style woven cotton fabric in not too modern colours, which is always hard to find here in Switzerland. However, the quality of the material was no the best choice for this project, as it was very soft and almost like flannel on one side, difficult to cut and a fight to sew. But it was the only fabric I had. As it was quite inexpensive, I thought it would be OK for my free-style sewing project. I didn't have a pattern...

First I made my daughter's skirt. As an inspiration, I had this costume pattern, seen somewhere on the internet. It's McCalls M4090. It is apparently a favorite amongst beginner costume sewers and is a kind of an allrounder for the  Medieval, Renaissance and even later eras.

McCalls M4090


The skirt has six gores, so it would have some fullness, but not too much, as I was not sure how comfortable my girl would feel with a long skirt. I didn't want her to stumble across the skirt's hem. This thought and the detailed sketch of one of the original pattern's view (view B) led me to another idea. I could, instead of adding the ribbons to tie the long skirt up, add a drawstring in the front, so the skirt could be gathered with a better hold, without loose ribbons coming in my daughter's way.


An elastic waistband gathers the width of the skirt and is comfortable to wear. It even allows my girl to grow. Well, the skirt would get shorter, but as a long underskirt can be worn with the plaid skirt, this would still look nice. Even though the elastic waistband was absolutely NOT historically true. What a shame... I guess I'm still too much the historian I was trained to be. :)


For my skirt, I wanted the drawstrings as well, but I changed my pattern for more fullness. Especially the side parts were made much wider. However, I soon realised that it wouldn't look very nice with a waistband gathering the fullness of the skirt. Even with an inserted elastic. I preferred only the side gores to be gathered, thus leaving the middle front and middle back parts flat. (I thought it would be more flattering for someone with a slightly more female figure...) Using no elastic or zipper would even add some authenticity to my skirt. Ah, history!

Somewhere on the internet I have seen Renaissance skirts with eyelets and lacing. Metal eyelets are not  really true to such a type of skirt (again, history!), and I didn't have time to order them. I also knew they wouldn't be suitable for this type of fabric. Or vice-versa. So I made small loops of bias binding matching the tartan colour. I sewed them in the seams between the middle front respectively middle back and the side parts. I have 4 rows of loops, 2 on each side, that are laced up with a string, so I can gather the fulness of the skirt on the side only. 
This is very comfortable, as the fit of the skirt is adjustable. And it's a very nice detail. It's a bit of a fight to put it on, especially when you are in hurry as everybody is waiting for you. (Usually, I'm the last to be ready to leave. I'm a mom, come on, that's the way it is and will be for the next 15 years...)

This is how my skirted turned out. It was finished only 1 hour before we left for the Highland Games event. I wore it with my vintage Advance 6754 blouse I described in my previous post.
I was not sure how good the skirt would look like or how it would fit, but it was surprisingly comfortable to wear and it looked quite decent, especially compared to many commercially made outfits I saw at the event. And again I felt a little bit proud to have an unique garment, not perfect, but truly what I wanted and fitting my figure. I will make also for me an underskirt to wear with the plaid skirt, completing my medieval inspired Scottish Highland dress.


Thursday, 25 July 2013

Wee Boy's Kilt

Finished toddler kilt from back with pleats

We are planning to attend to the Highland Games held in a place not far away from where we live. As I love Scotland and all things Scottish, we have to go there. Absolutely.

Me and my husband, we have kilts, genuine Scottish kilts of course, made of wool. But what about our kids?

This event demands for a suiting outfit, and as in Switzerland it's probably impossible to get Scottish dresses for a little boy and girl, I have to make it myself.

Here's the mini kilt for our 18 month old son. If you are interested in sewing a toddler or baby/infant kilt yourself, you can easily follow my description as a guide. I have made a kind of kilted mini-skirt for me before, years ago when I was young and lank and wanted to show my legs. So I knew what was waiting for me...

Of course I first made some research about how kilts are made. This garment is quite interesting, and it usually asks for a lot of fabric. Some illustrations looked very complicated, almost frightening...

From costumes.org
From costumes.org

They may be  good for a adult's outfit done by a professional kilt maker. But not very helpful for a mini kilt.

This one is a extremely simplified version especially for small kids and was only of limited use for my project.

Scheme 1


Of course I KNEW there were different types of pleats, but I didn't know how many and how difficult it probably could be to make them. As I said, the whole project should be quickly done, I decided to go for the most common pleats, the casual knife pleats.

Scheme 2
I had a small piece of wool-looking tartan-woven poly fabric in decent boy's colours I had bought on sale, just enough to make a slightly longer than knee-length kilt. I didn't want my boy to grow out of this garment outfit within 2 months, so I planned to make it slightly larger.

There is a lovely instruction with some good sketches about making a kilt for Highland dancers. In the end, my baby boy kilt was something like scheme 3 and 4, even though I first wanted to make the kilt as simple as possible. (As usual I am very late with these projects for the Highland Games...) Maybe I tend to like things that are complicated -  they are more of a challenge to my skills than the too simple ones... But in the first place I wanted it to be a slightly simplified version of an adult's kilt, so the sketch show here was very helpful. Of course I compared it to my own professionally made kilt I bought in Scotland and made some alterations.

Scheme 3

This illustratione depicts very well how the finished kilt, if you like to add a lining etc, could look like from the left side...

Scheme 4


As to the making....

Skill requirements

This is definitely a project for a skilled beginner or an advanced sewer. Especially the pleats are a little bit more demanding. And the maths for the exact measurements should be done precisely. If you do not like to work as accurate as possible, you should maybe find a different project. A kilt is an accurately made garment, especially the pleated part. Be sure you have enough time (unlike me...), if you have never done something like that before. I usually don't rarely baste stitch my projects, as I am too lazy ta save time. But to get all the pleats neatly, it's absolutely necessary to baste stitch each and every one!


Fabric requirements and notions

This garment needs no pattern as such. I just measured my boy's belly circumference (although he is not chubby at all, never was, he still has this buddha-like belly, adorable!). It is 46cm. For the apron parts I took almost 1/2 each of the circumference, about 24 cm each, which would be reduced by 2 darts an each of the aprons. Thus the aprons would be about 21cm in the end.

This requires the pleated back-part to measure about 25 cm, but with slightly more of the double amount of fabric - due to the requirement of the knife pleats. Looking at the  relevant scheme, you easily can see that the pleats double the fabric. So make sure you have enough fabric available. 
The pleats should be done in a way that arranges the stripes of the tartan fabric in a nice way. Of course, the pattern repeat differs from fabric to fabric, depending how small the plaids are. I was veeeery lucky that the pattern in my case was just perfect for the depth of the pleats. My pleats were about 2.5 cm deep, and just by sheer luck I could arrange the stripes in a way that a regular pattern resulted in the pleated back part. (Look at the pictures below.) But don't become desperate when it doesn't work like that with your tartan fabric. It doesn't come out that even with professionally made kilts. As I said, it all depends of the size of your tartan pattern and the depth of your pleat.

Normally, such fabrics are not wide enough, so you may have to sew the pieces together. This is not a problem, as professionally made kilts are made the same way, and the seam can be hidden in the pleats.

I was again lucky as the 130cm wide fabric was just enough for the small kilt.

As to the length of the fabric, I had a circa 35cm long fabric piece. My kilt should be just a little bit longer than knee-length, about 22cm. Add some seam allowance for the hem, at least 3cm, and some for the upper edge where the waistband is going to be sewn on, about 1 cm or a little bit more. Of course you will also have to make a waistband. For a finished band of 1.5cm, you need 5-6cm of fabric. My fabric piece was just big enough for this project.

You need a cotton or linen fabric remnant if you wish to make a lining on the top part. This however depends on what kind of fabric you use and how true you want to be with your copy of a "real kilt". For my son's kilt I didn't want to have one, and I was in a hurry to finish the project, so I let the lining

For the closures, I used small leather straps and buckles I once made for the above mentioned skirt. As I can't wear it anymore and is a rather embarrassing, I wanted only to re-use these small closures as they looked like the ones used on Scottish kilts. I think you can also buy them in well-assorted haberdashery stores, this of course saves a lot of time and work.


Fabric recommendation

I highly recommend a polyester fabric or a poly-wool blend. Woolen tartans are often on the more expensive side. As they are available in various weights, if you maybe have genuine woolen tartan fabric, a leftover from another project, make sure it's rather a lightweight fabric. Heavy fabrics make such a small garment very bulky and are, according to my experience with heavy-weight tartan fabrics, rather difficult to work with if you are not used to it.

Of course you can also use fabrics of a similar texture or weight, such as medium- or light-weight jeans, cord, tweed, woolen flannels etc. It's up to you! But please keep in mind that pleats, even if ironed well, last better in synthetics, woolens and blends than in cotton.


Technical requirements

You need a sewing machine. A serger is nice to neaten the bottom hem, but you can do that with your sewing machine too. Be sure you have machine needles for thick fabrics. 

A hand-needle and some thread for basting and some for sewing. Scissors of course. A measure band.

And, last but certainly not least: an iron!
That's it.


Related Posts Plugin for WordPress, Blogger...